The first impression of a place is formed at first sight, and the entryway plays a central role in that experience. Double steel doors are gaining popularity as an excellent solution for projects that require both durability and robust architecture. Whether you are building a building, designing the exterior of your business, or creating a unique hospitality center, these types of double doors will impress you and everyone who sees them. They not only add a great look to a beautiful door exterior but also provide long-lasting, desirable durability. USA Builders Depot‘s latest collection, available in 2026, brings this design closer to your home.
What Makes Double Steel Doors the Superior Choice?
However, the appeal of double steel doors extends beyond their external beauty. This is because the double door design creates a large, balanced entrance that is not only attractive but also serves as a beautifully designed interior entrance, suggesting a well-groomed space behind the double door. From an architectural point of view, the symmetry of the double-door design symbolizes stability, nobility, and confidence. In addition, double doors create a wide enough path for easy furniture movement, which is never possible with a single door. Double doors made of steel and iron offer advantages beyond their aesthetics. Due to the nature of this material, such doors do not warp, swell, crack, or generally deteriorate over time, unlike wood.
USA Builders Depot’s Double Steel Door Range
Our wide range of double steel doors is made from high-quality iron and double-pane low-e glass, available in various sizes, glass thicknesses, and designs.
3 Lite Double Steel Door (60×80″)
As the entry-level model in the Double Door series, the 3 Lite Double Steel Door is the most affordable. At 60 inches wide and 80 inches high, this door is perfect for the height of a typical residential entryway while still offering the beauty of a full double-door setup. With six clear glass panels between the two door panels, it adds a touch of beauty while maintaining the privacy of a glass-enclosed door.
With the launch of the 4 Lite Double Steel Door, its design has changed. It adds four glass panes to each door panel, making the entire door set eight in total. This new design maintains the glass-to-frame ratio, which is not only aesthetically pleasing but also ensures durability and energy efficiency due to its all-steel structure.
The superior, 60 x 80-inch 5 Lite double steel door is designed for ceilings that require a higher-than-average height. The ten clear glass panels in the door allow for ample natural light to enter the entryway. Additionally, its 96-inch height makes it ideal for large-scale projects such as luxury residences and commercial establishments. It features a 2-inch-thick steel slab, a 6-inch thermally insulated jamb, and low-E glass.
Of all the options available, the largest, the 60×120-inch 8 Lite double steel door, is ideal for spaces where grandeur and opulence are essential. Since these double steel doors are 120 inches tall, they only need to be installed in spaces where the ceiling is higher than normal. With sixteen clear glass windows, these doors allow maximum light to enter the interior, blurring the boundaries between indoors and outdoors and defining the entryway’s design in our modern era.
Cuivre Classic and Cuivre Modern Double Doors
However, when uniqueness is desired, the Cuivre range offers two distinct double-door models. These are the Cuivre Classic, with an ornate design inspired by the tradition of the double-door range, and the Cuivre Modern, which gives the double-door a modern twist. Like the rest of the range, these two styles are made using the same high-quality iron and feature the same technical features as the other products.
Performance Features That Matter
Each pair of double steel doors in the USA Builders Depot range has the following premium features:
Low-E double-pane glass: It prevents heat transfer, blocks up to 90% of heat rays from entering the interior space, and contributes significantly to the building’s energy efficiency.
Metal frame and slab: Rust-resistant, stain-resistant, and does not change its shape in adverse conditions, which is the case with wooden products.
2-inch thickness: Each door is 2 inches thick – this thickness is consistent with the material’s nature and enhances its soundproofing and resistance to unauthorized entry.
Hardware package: Hinges, weatherstrips, seals, and sweeps are pre-drilled with each steel double-door set.
Black finish on metal parts: The black color of the hinges, seals, and other metal parts gives the entire set a cohesive look as soon as you open the box.
Elevate Every Entrance
From simple residential renovations to important commercial entrances, USA Builders Depot’s double steel doors give every project the dignity and quality it deserves. With fast nationwide shipping, a 90-day money-back guarantee, and a special trade program for professionals, USA Builders Depot makes it easy to specify and procure premium entry systems for projects of any size.
Choosing the right siding professional can make a major difference in your home’s appearance, protection, and long-term value. Vinyl siding is a popular choice for many homeowners because it is durable, low-maintenance, and available in different colors and styles. However, the quality of the installation matters just as much as the material itself.
Before hiring a local siding expert, it is important to ask the right questions. A reliable contractor should be transparent, experienced, and willing to explain the process clearly. This helps you avoid poor workmanship, unexpected costs, and project delays.
Why Hiring the Right Siding Contractor Matters
Your siding does more than improve curb appeal. It helps protect your home from moisture, wind, heat, and everyday exposure to the elements. If it is installed incorrectly, gaps, warping, water damage, and insulation issues may appear over time.
A qualified siding contractor understands proper installation methods, local weather conditions, and the best materials for your property. Instead of choosing based on price alone, homeowners should look at experience, reputation, communication, and warranty coverage.
Questions to Ask Before Hiring a Local Siding Expert
Are You Licensed and Insured?
One of the first questions to ask is whether the contractor is licensed and insured. Licensing shows that the contractor meets local requirements, while insurance protects you in case of accidents or property damage during the project.
Ask for proof of both before signing any agreement. A professional contractor should have no problem providing this information.
How Much Experience Do You Have With Vinyl Siding?
Not all exterior contractors specialize in vinyl siding. Some may focus on roofing, general repairs, or other home improvement services. Since vinyl siding requires proper measurement, cutting, fastening, and sealing, experience is important.
When comparing vinyl siding contractors near me, ask how long they have been installing vinyl siding and whether they handle both replacement and new installation projects.
What Is Included in the Estimate?
A detailed estimate should explain the cost of materials, labor, removal of old siding, cleanup, disposal, and any additional preparation work. Avoid vague quotes that only provide a total price without itemized details.
A clear estimate helps you understand what you are paying for and reduces the risk of surprise charges later.
What to Know About Materials and Installation
What Type of Vinyl Siding Do You Recommend?
Vinyl siding comes in different thicknesses, finishes, colors, and profiles. Ask the contractor which type they recommend for your home and why. A good siding expert should explain the benefits of each option based on durability, appearance, maintenance, and budget.
They should also help you choose siding that matches your home’s design and improves overall curb appeal.
How Will You Prepare the Home Before Installation?
Proper preparation is a key part of a successful siding project. The contractor may need to inspect the existing exterior, remove damaged materials, check for moisture issues, and prepare the surface before installing new siding.
Asking this question helps you understand whether the contractor takes time to do the job correctly instead of rushing through the process.
Who Will Handle the Installation?
Some companies use in-house teams, while others hire subcontractors. Either option can work, but you should know who will actually be working on your home.
When researching vinyl siding installers near me, ask whether the crew is trained, supervised, and experienced with the specific siding product being installed.
Warranty, Timeline, and Communication
What Warranty Do You Offer?
A siding project should come with clear warranty information. Ask about both the manufacturer’s warranty for the siding material and the workmanship warranty from the contractor.
Make sure the warranty details are written in the contract. This gives you better protection if problems appear after the installation is complete.
How Long Will the Project Take?
The timeline may depend on your home’s size, the condition of the existing siding, weather, and material availability. A reliable contractor should provide a realistic schedule and explain what could affect completion.
Clear timelines help you plan around the project and avoid unnecessary confusion.
How Will You Communicate During the Project?
Good communication is often a sign of professionalism. Ask who your main contact will be, how updates will be shared, and what happens if concerns arise during the installation.
A dependable contractor should keep you informed from the first inspection to the final cleanup.
Final Thoughts
Hiring a local siding expert should never feel rushed. Take time to ask about licensing, insurance, experience, materials, estimates, warranties, and communication. The right contractor will answer your questions clearly and help you feel confident about the project.
Vinyl siding can be a smart investment for improving your home’s exterior, but the results depend heavily on proper installation. By asking the right questions before hiring, you can protect your home, manage your budget, and choose a siding professional who delivers lasting value.
Commercial and residential pool construction may appear similar at a glance, but their purposes shape every aspect of design and execution. Residential pools are built for private enjoyment, relaxation, and aesthetic appeal. Homeowners often prioritize customization, comfort, and features that reflect personal style.
Commercial pools, on the other hand, are designed for high traffic and public use. Hotels, resorts, fitness centers, and community facilities require pools that can handle continuous usage while maintaining safety and durability. The focus shifts from personalization to functionality, compliance, and long-term performance.
Design and Structural Requirements
Residential pools allow for creative freedom. Shapes, finishes, and features like waterfalls or integrated spas are tailored to complement the home’s architecture and the owner’s vision. Structural demands are less intensive because usage is limited to a smaller group.
Commercial pools require more robust engineering. They must meet strict structural standards to support larger volumes of water and frequent use. Depth markers, accessibility features, and clearly defined entry and exit points are essential components. The design must also ensure smooth circulation and efficient maintenance.
Regulations and Compliance
Safety Standards
One of the most significant differences lies in regulatory requirements. Residential pools must follow local building codes, but these are generally less complex than those governing commercial installations.
Commercial pools must comply with extensive health and safety regulations. These include proper filtration systems, sanitation protocols, and safety equipment. Inspections are more frequent, and adherence to guidelines is critical to avoid operational issues.
Permits and Approvals
Obtaining permits for a residential pool is usually straightforward, involving local authorities and standard documentation. The process is typically quicker and less demanding.
For commercial pools, the approval process is more rigorous. Detailed plans, engineering reports, and compliance documentation are required before construction begins. This ensures the facility meets all public safety and health standards.
Cost and Maintenance Considerations
Initial Investment
Residential pool construction costs vary based on design complexity and materials. While still a significant investment, it is generally more manageable compared to commercial projects.
Commercial pools involve higher upfront costs due to larger scale, advanced systems, and regulatory requirements. The need for durable materials and specialized equipment also contributes to the overall expense.
Ongoing Maintenance
Maintenance for residential pools is relatively simple and can often be managed by homeowners or routine service providers. Cleaning, chemical balancing, and occasional repairs keep the pool in good condition.
Commercial pools demand a more intensive maintenance schedule. Regular monitoring, professional servicing, and strict adherence to sanitation standards are necessary to ensure safety and longevity.
Choosing the Right Approach
Whether building a residential retreat or a commercial facility, understanding these differences is essential. Each type of pool requires a tailored approach to design, construction, and maintenance. Working with experienced professionals ensures that the final result meets expectations, complies with regulations, and delivers lasting value.
This post was written by a professional athttps://sunsationpools.com. Sunsation Pools & Spas, Inc. is a full-service pool and deck construction company in Largo, FL, specializing in remodeling and design. As one of the leading pool and deck construction companies near you, we serve clients throughout the Tampa Bay Area. Our experienced team provides expert guidance and reliable solutions, making us a trusted choice for pool and deck construction near you focused on quality, value, and performance.
Sealing is important in ensuring that structures are not damaged by water and the interior is not affected by moisture. The flashing for roofsystems will avoid leakage at the joints, edges, and other susceptible areas where water can be accessed easily. Durability is enhanced by the strong materials and proper installation, which will ensure that the new system will require fewer maintenance requirements in the long run. Human beings do not pay much attention to these elements; they critically resist against weathering changes. The risk of selecting the right options is to provide long-term security without repairing it regularly or having structural issues that may occur without any notice in terms of safety or stability.
Roof edges will not be susceptible to water intrusion in times of heavy rainfall, and thus, good sealing materials will keep the joints in place and keep them dry despite the weather conditions of all seasons without frequent repairs and replacements.
Learning Material Types Used.
Various materials, such as metal rubber composites, offer different durability, flexibility, and resistance, which is why the selection of materials should be applied depending on the exposure to the climate, the structural requirements, and installation procedures, so that the performance may be guaranteed long-term, and early damage will not happen.
Weather Resistance Enhances Life Expectancy.
Weather exposure can have an impact on the sealing of components with time. Selecting materials that are resistant to heat, moisture, and powerful wind will ensure performance and help avoid cracks, corrosion, and early failures of the component in harsh environments.
Helps are included in maintenance to increase performance.
Constant checking would detect the signs of damage in their early stages, like cracks, loosening, and corrosion. Early repairs will prevent the occurrence of bigger problems and ensure that protection is consistent without the need to pay a lot for replacement of the damaged parts later.
Care is sought in Sealing openings.
Precautious sealing of areas around vents, joints, and edges is necessary as they are exposed to greater amounts of water, hence good coverage will guarantee a strong protection against exposures with the risk of internal damage being avoided over the long usage.
The flow of the drain should be facilitated.
Drainage- These components should be sealed to direct water flow without avoiding the flow, thus creating pools and forcing more weight on the joints, thereby leading to structural safety concerns over time.
Superior Materials saves on the number of repairs.
Good quality materials have a higher resistance to wear, moisture, and temperature range; hence, spending on quality products will mean fewer repairs in the future and the same level of protection in varied environments.
Professional Advice Enhances the selection decisions.
Consultation with experts assists in the use of appropriate materials and installation techniques, depending on the nature of the structure and the level of exposure, so as to achieve improved performance and minimize the chances of making the wrong decisions that may result in damage over time.
Balance Costs Favor prudent decisions.
The cost-quality ratio guarantees the savings over the long term as the cheaper ones often need a replacement, whereas the quality materials can assure durability and, due to this fact, will cost less to maintain within certain time frames.
The selection of sealing material to be used in protecting structural performance is supported by careful planning and, consequently, the lasting performance. Learning about the material strength, the right installation, and the constant check enhances the reliability in varying conditions. The correct flashing for roof is a wise decision, which prevents the roof against an invasion of water and minimizes the maintenance requirements. A trade-off decision between quality, cost, and performance has provided a balance that ensures structural stability without many repairs and uncertainties that occur in the long run.
Concrete is one of the most durable building materials used in homes and commercial spaces across the United States. Driveways, sidewalks, patios, and foundations rely on it for strength and longevity. However, even well-installed concrete can develop cracks, uneven surfaces, and structural wear over time. Understanding the reasons behind damage and knowing when to act helps property owners maintain safety, appearance, and long-term value.
In cities with changing seasonal conditions like Cedar Rapids, maintaining concrete surfaces is especially important. Property owners who understand the basics ofconcrete repair in Cedar Rapids can prevent small issues from becoming costly structural problems.
Why Concrete Surfaces Deteriorate Over Time
Concrete may appear solid and permanent, but it naturally responds to environmental stress. Several factors contribute to deterioration.
Weather and Freeze-Thaw Cycles
Cold winters and seasonal temperature shifts cause concrete to expand and contract. Water enters tiny pores, freezes, and expands, creating cracks or surface flaking.
Soil Movement
The ground beneath concrete slabs can shift due to moisture changes or erosion. When soil moves, concrete may sink, tilt, or separate.
Poor Drainage
Water that collects around concrete surfaces weakens the material over time. Standing water also accelerates cracking during cold weather.
Heavy Loads
Driveways and garage floors often bear the weight of vehicles and equipment. Repeated pressure can cause surface stress and structural damage.
Common Signs Your Concrete Needs Attention
Many homeowners overlook early warning signs until the damage becomes obvious. Recognizing these signals early allows for quicker, less invasive repairs.
Look for the following indicators:
Hairline cracks spreading across driveways or patios
Uneven or sunken slabs creating tripping hazards
Water pooling in low spots after rainfall
Chipping or surface flaking, often called spalling
Gaps between slabs or structures such as garage floors and foundations
These issues often signal the need for professional evaluation and possibly concrete repair in Cedar Rapids before structural concerns worsen.
Practical Repair Methods for Damaged Concrete
Modern repair techniques focus on restoring durability while minimizing disruption. The right approach depends on the severity and location of the damage.
Crack Filling and Sealing
Small cracks can often be repaired using flexible sealants or fillers. This process prevents water infiltration and stops cracks from spreading.
Concrete Resurfacing
When surfaces show widespread wear but remain structurally sound, resurfacing adds a thin new layer that restores appearance and strength.
Slab Leveling
Sunken concrete can be lifted using specialized methods that stabilize the soil beneath the slab. This restores even surfaces without replacing the entire structure.
Section Replacement
In cases where damage is extensive, removing and replacing the affected portion may be the safest long-term solution.
Preventing Future Concrete Damage
While repairs are sometimes unavoidable, preventive maintenance can significantly reduce future problems.
Homeowners can protect their concrete by:
Sealing surfaces to reduce water penetration
Maintaining proper drainage around slabs
Avoiding heavy loads beyond design limits
Cleaning and inspecting surfaces regularly
Addressing small cracks before they expand
These simple practices help preserve structural integrity and improve the lifespan of outdoor and structural concrete features.
Long-Term Value of Timely Concrete Repairs
Timely maintenance improves more than appearance. Proper repairs enhance safety, prevent trip hazards, and protect the structural stability of surrounding areas. Well-maintained concrete also contributes to property value and curb appeal, particularly in residential neighborhoods where driveways and sidewalks shape first impressions.
When property owners stay informed about concrete repair in Cedar Rapids, they are better equipped to make practical decisions about maintenance, repairs, and long-term property care.
Final Thoughts
Concrete remains a reliable construction material, but it requires occasional care to maintain its strength and appearance. Understanding the causes of damage, recognizing warning signs, and exploring appropriate repair methods can help homeowners and property managers protect their investments for years to come.
For those researching local information, companies such as Tomlinson Cannon are often part of the broader conversation around concrete maintenance and restoration in the Cedar Rapids area, providing insight into how communities approach long-term infrastructure care.
The right bathroom faucet does more than deliver water. It transforms the entire look and feel of your space, while impacting function every day. Deciding which faucet to buy, and how to install it, can seem intimidating for first-timers. With the right know-how, however, you can upgrade your bathroom quickly and confidently, no plumbing degree required.
What Types of Bathroom Faucets Are Available and Which One Is Right for You?
Choosing a faucet style is your starting point. But what styles are out there, and what do they mean for your installation process?
What Are the Most Common Faucet Styles?
Single-hole faucets are compact and minimalist. They combine spout and handle in one unit, perfect for smaller sinks or a streamlined look. Widespread faucets come as three separate pieces (spout plus two handles), offering a classic, customizable appearance, but require more counter space. Centerset faucets combine all parts on a single base, fitting standard pre-drilled sinks and making installation a breeze. Wall-mounted faucets, as the name suggests, are installed on the wall above the sink, often lending a spa-like feel, but these require precise plumbing placement.
How Do Different Faucet Types Affect Installation?
Single-hole and centerset faucets typically install into one or three holes respectively, making them beginner-friendly. Widespread models need more measuring and alignment but provide design flexibility. Wall-mounted versions are the trickiest, as they require running plumbing lines inside the wall, usually best left to professionals unless your bathroom is already under renovation.
Which Faucet Materials and Finishes Should You Consider?
Brass is prized for durability, while stainless steel resists corrosion and fingerprints. Chrome is easy to clean, affordable, and versatile, making it a default choice for many. Matte black, brushed nickel, and trendy gold tones can elevate the look but may require more attentive cleaning to keep them looking fresh.
What Tools and Materials Do You Need Before Starting?
Preparation saves time and headaches. Having everything on hand helps your project go smoothly from the first bolt to the last water test.
Essential Tools for Faucet Installation
– Adjustable wrench
– Basin wrench (for tight spaces)
– Plumber’s tape
– Screwdriver set
– Bucket or towels (to catch drips)
Additional Supplies to Keep on Hand
Consider picking up flexible supply lines and replacement shut-off valves if your existing ones are dated or corroded. Silicone caulk helps seal and prevent leaks around the faucet base.
How to Prepare Your Workspace for Success
Clear out everything from under the sink. Place a towel or shallow pan to catch residual water. Shut off both hot and cold water valves under the sink and turn on the faucet to drain any remaining water.
How Do You Remove Your Old Bathroom Faucet Safely?
With tools and workspace ready, it’s time to say goodbye to your old faucet.
What Steps Ensure a Smooth Removal Process?
First, disconnect supply lines at the shut-off valves. Use your wrench to loosen and remove mounting nuts holding the faucet in place. Gently lift out the old faucet, taking care not to scratch your sink.
How to Handle Common Removal Challenges
Rusty or stuck nuts are a common headache. Apply penetrating oil and wait a few minutes, then try again. For tight spaces, a basin wrench is invaluable. If you discover damaged plumbing or suspect hidden leaks, pause the project.
When to Call a Professional Instead
Major corrosion, damaged shut-off valves, or leaking pipes are signs you should consult a plumber rather than risk bigger issues.
How Do You Install a New Bathroom Faucet Step-by-Step?
A fresh faucet can be installed in under an hour with patience and attention to detail.
How to Assemble the Faucet Components
Follow the manufacturer’s instructions for pre-assembly. This often involves attaching gaskets or sealing rings to the base and possibly pre-connecting parts under the sink.
What Are the Key Steps for Proper Placement and Mounting?
Lower the faucet into the sink holes, making sure everything aligns. Secure from underneath with mounting nuts, tightening evenly to avoid shifting.
How to Connect the Water Supply Lines Correctly
Attach new or cleaned supply lines to the faucet shanks, then to the shut-off valves. Use plumber’s tape for a watertight seal.
How to Test for Leaks and Proper Function
Turn the water supply back on, then open the faucet handles. Check all connections for leaks and tighten as needed. Let the water run a minute to clear debris.
How Do You Troubleshoot Common Faucet Installation Problems?
Even a careful job can run into surprises.
What to Do If Water Is Leaking
Check all connections for tightness. If leaks persist, remove and reapply plumber’s tape to threads, or check that gaskets are seated correctly.
How to Fix Low Water Pressure Issues
Make sure the supply valves are fully open. Remove and rinse the aerator at the faucet tip to clear sediment.
How to Address Alignment or Fit Problems
If the faucet feels loose or crooked, loosen the mounting nuts, straighten the faucet, and retighten evenly.
How Do You Maintain Your New Faucet for Longevity?
A little care keeps your investment looking sharp and working smoothly.
What Cleaning Methods Preserve Finish and Function?
Wipe with a soft cloth and mild soap. Avoid harsh cleaners, which can dull finishes like matte black or brass.
How Often Should You Inspect and Tighten Fixtures?
Every few months, check under the sink for leaks and retighten any loose mounting hardware.
When to Replace Parts or Schedule Professional Maintenance?
Replace washers, aerators, or cartridges if you notice drips or inconsistent flow. For persistent leaks or wobbly faucets, a quick call to a plumber may save money in the long run.
Where Can You Find Quality Faucets and Installation Support?
Choosing the right product and support ensures installation is just the start of a positive experience.
What to Look for in a Faucet Supplier?
Seek out suppliers known for both design and reliability. Brands offering solid warranties and customer support are preferable. For a blend of modern design and solid craftsmanship, Vasca alt faucets are a helpful resource to explore.
How to Use Showrooms and Online Resources Effectively?
Visit showrooms to see finishes and styles firsthand. Online guides, videos, and customer reviews provide valuable installation tips and product feedback.
When to Hire a Licensed Plumber for Installation Assistance?
If your project involves unusual plumbing, wall-mounts, or you simply want peace of mind, a licensed plumber is well worth the investment. Your bathroom’s fresh new look will be trouble-free for years to come.
A polished interior finish relies on careful attention to detail, particularly where different surfaces meet. The transition between various materials presents both a practical challenge and a design opportunity. Quality carpet trims serve as the essential bridge that ensures smooth, safe, and visually appealing connections throughout a property.
These specialised components play a crucial role in maintaining structural integrity while enhancing the overall aesthetics of a space. They create seamless joins between carpet and hard flooring, preventing fraying edges and potential trip hazards. The right selection contributes significantly to the longevity and appearance of the entire flooring scheme.
This guide explores the various profiles, materials, and techniques available to achieve professional results. Understanding these fundamentals empowers homeowners, contractors, and designers to make informed choices. The correct application of these finishing touches elevates any interior project from ordinary to exceptional.
Key Takeaways
Carpet trims are essential for creating safe and durable transitions between different floor coverings.
They enhance the visual appeal of a room by providing clean, finished edges.
Various profiles and materials are available to suit different installation requirements.
Proper selection ensures longevity and protects carpet edges from wear and damage.
Professional installation techniques guarantee optimal performance and aesthetic results.
Understanding trim options helps in making informed decisions for residential and commercial projects.
The right finishing details significantly impact the overall quality of a flooring installation.
Introduction to Professional Floor Installation Solutions
Where various floor coverings meet, specialised components ensure both safety and visual harmony. These essential elements transform potential problem areas into seamless, durable connections. They represent the finishing touches that distinguish ordinary work from exceptional craftsmanship.
The flooring industry provides numerous solutions for common challenges. Height variations between materials and exposed edges require specific approaches. Understanding available products helps select the right solution for each scenario.
Different types of joining systems address various installation needs. Some handle significant level differences, while others create smooth transitions between similar surfaces. This information forms the foundation for making informed choices.
Quality solutions balance functional requirements with aesthetic considerations. They ensure surfaces remain secure while maintaining visual continuity across room boundaries. The right selection contributes significantly to long-term performance.
This section provides essential knowledge for navigating the comprehensive range of options. It serves as a starting point for understanding how these components integrate into broader projects. Proper application leads to successful, lasting results.
Guide to carpet trims for professional floor installation
Specialised joining profiles transform potential problem areas into smooth, durable transitions throughout interior spaces. These components bridge height differences and protect vulnerable edges where materials converge.
Carpet trims serve multiple essential functions in interior projects. They provide structural support while creating clean visual finishes. Different profiles accommodate specific joining scenarios effectively.
Profile Type
Best Application
Key Features
Material Options
Z-Bar
Carpet to hard surfaces
Secures edges firmly
Aluminium, brass
Reducer
Height differences
Sloping transition
Wood, vinyl
End Cap
Edge protection
Prevents fraying
PVC, metal
Square Edge
Same level surfaces
Clean finish
Various finishes
The right selection balances practical requirements with aesthetic considerations, ensuring surfaces remain secure while maintaining visual continuity.
Choosing appropriate trims depends on several factors. Carpet thickness and subfloor conditions influence the decision. Desired appearance also plays a significant role.
Understanding profile types and functional characteristics enables informed decision-making. This knowledge supports successful planning through to execution. The right choices contribute to long-term performance and visual appeal.
Benefits of Quality Carpet Trims
Well-chosen transition pieces act as guardians for flooring investments. They deliver advantages that extend far beyond a simple visual finish. Quality Carpet Trims provide enhanced durability and superior aesthetic appeal.
Premium products resist bending and denting over time. They maintain their structural integrity even in high-traffic areas. Cheaper alternatives often fail quickly under similar pressure.
Investing in good trim protects vulnerable edges from fraying. This extends the lifespan of expensive materials. It also reduces long-term maintenance and replacement costs.
Superior materials like solid brass offer exceptional strength. They provide much better stability than thin aluminium options. This results in a cleaner, more professional visual transition.
The benefits also include installation efficiency. Well-engineered components fit accurately and adjust easily. They secure reliably without needing special tools.
Property owners who prioritise quality report higher satisfaction. They experience fewer issues related to component failure. This makes the initial investment clearly worthwhile.
Overview of Industry Materials and Finishes
Modern interior projects benefit from a diverse range of material options available for seamless transitions. The industry offers extensive choices to complement various design aesthetics and functional requirements.
Wood, Laminate, and Vinyl Options
Natural wood finishes like oak and hickory provide traditional warmth. These coordinate beautifully with laminate installations throughout residential spaces.
Vinyl alternatives offer practical solutions for moisture-prone areas. Their resistance to water makes them ideal for kitchens and bathrooms where natural materials might struggle.
The Premier range demonstrates how quality finishes elevate any project. Their solid brass constructions outperform cheaper aluminium options that dent easily.
Metal, Aluminium, and Other Finishes
Metal profiles deliver exceptional durability for high-traffic zones. Solid brass options come in various finishes including antique brass and brushed chrome.
While aluminium represents a budget-friendly choice, professionals note its limitations. Thin profiles may bend under pressure, requiring earlier replacement.
Contemporary designs often mix material types for visual contrast. This approach balances aesthetic preferences with practical performance requirements.
Selecting the Right Trim for Different Floor Types
Different surface materials demand tailored approaches to ensure seamless connections and long-lasting performance. The choice depends on material characteristics and installation requirements.
Transition and Edge Solutions
Specific profile designs address unique joining scenarios effectively. Each serves a distinct purpose in creating smooth connections.
Profile Model
Primary Application
Material Compatibility
Key Advantage
Premier Z9
Carpet to tile surfaces
Ceramic, porcelain
Conceals raw edges completely
Premier SQ
Butt-join to tiles
All hard surfaces
Reveals tile edge profile
Premier Z13
Extra thick carpets
Plush materials
Prevents pile compression
Premier Z4
Thin flatweave materials
Natural fibres
Low-profile safety design
Tailoring Trim Choices to Carpet and Hard Flooring
Height differentials and material thickness influence selection decisions. The Premier Z9 creates level transitions from carpet to ceramic surfaces.
Alternative profiles like the Premier SQ cater to contemporary aesthetics. They showcase tile edges rather than concealing them.
The right profile selection balances functional requirements with design preferences, ensuring both performance and visual appeal.
Extra thick installations benefit from deeper profiles like the Z13. Thin materials require low-profile solutions such as the Z4 for safety and definition.
Enhancing Room Aesthetics with Professional Finishes
Aesthetic coherence in interior design depends heavily on how transitional elements integrate with the broader decorative scheme. These components should enhance rather than interrupt visual flow throughout living spaces.
The visual impact extends well beyond the immediate transition area. It influences perceptions of quality and attention to detail across entire rooms.
Coordinating finishes with existing architectural features creates harmonious continuity. Matching door hardware, light fixtures, and window treatments elevates the overall presentation.
Contemporary trends increasingly view these products as creative opportunities. Contrasting tones can define spaces while coordinating colours promote seamless visual movement.
Quality finish options demonstrate superior craftsmanship standards. They signal that property owners prioritise excellence in every specification detail.
Premium selections in high-traffic zones deliver disproportionate aesthetic benefits. Their modest cost increment over basic alternatives represents excellent value.
Room aesthetics improve substantially when transitional products receive careful consideration. This approach results in polished, professionally executed spaces where carpet meets other flooring materials seamlessly.
Comparative Analysis of Market Trim Products
Product ranges in the finishing sector demonstrate significant variation in construction quality and price points. Understanding these differences helps consumers make informed purchasing decisions that balance budget constraints with long-term performance requirements.
Innovative Features of Premium Products
The market offers solutions across broad price brackets. Economy options start around £4.99, while premium selections can exceed £16.95. This price range reflects corresponding differences in materials and durability.
Mid-market offerings like the Prestige range provide various profile configurations. These include Dual Edge for transitions between soft coverings and Z Edge for joining to laminate surfaces. The product line offers multiple colours and custom lengths.
Premium alternatives distinguish themselves through superior construction. The Premier range features solid brass components available in ten distinctive finishes. This represents a quality upgrade over standard aluminium options that may dent under pressure.
Market Segment
Price Range
Key Materials
Notable Features
Economy
£4.99 – £8.99
Thin aluminium, basic PVC
Basic functionality, limited finishes
Mid-Market
£9.00 – £14.99
Reinforced aluminium, wood composites
Colour options, custom lengths
Premium
£15.00 – £20.00+
Solid brass, hardened alloys
Tool-free installation, height adjustment
Comparative analysis reveals important cost considerations. Budget products may seem economical initially but often require earlier replacement. Premium selections typically offer better long-term value despite higher upfront costs.
Innovative features increasingly focus on installation convenience. Advanced products incorporate mechanisms that reduce fitting time while ensuring secure results. Consumer feedback consistently praises premium options for their appearance retention and performance.
Precision in Measurements and Installation Techniques
Meticulous measurement practices separate amateur attempts from truly polished interior transitions. Even the highest quality components fail when measurements lack accuracy.
Proper assessment of surface levels and transition widths forms the foundation of success. These initial steps determine whether final results appear seamless or reveal obvious gaps.
Achieving Seamless Transitions
Skilled fitters account for material compression and subfloor irregularities during measurement. They anticipate how different surfaces behave under pressure and temperature changes.
Precise cutting eliminates overhangs and prevents tripping hazards. Components must fit exactly without forcing or leaving visible spaces.
Dry-fitting before final fixing allows for incremental adjustments. This technique ensures perfect alignment across different material types.
Essential Tools and Accurate Fitment
Quality instruments make precise work achievable. Basic tools alone cannot guarantee professional outcomes.
Specialised equipment includes profile gauges for irregular shapes and precision cutters for various materials. Levelling equipment accurately assesses height differentials between surfaces.
Essential Tool
Primary Function
Critical Feature
Digital Laser Measure
Accurate distance calculation
Eliminates tape measure sag error
Profile Gauge
Replicates irregular shapes
Adjustable pins capture complex contours
Mitre Saw with Fine Blade
Precise component cutting
Clean cuts without material tear-out
Digital Spirit Level
Height differential assessment
Digital readout for minute variations
Proper substrate preparation ensures surfaces are clean and structurally sound. Secure fixing methods distribute loads evenly across the transition area.
Accurate fitment prevents premature failure and maintains visual continuity. These techniques demonstrate why skilled application justifies investment through superior long-term performance.
Expert Carpet Installation Techniques
Achieving a flawless finish requires mastering specific techniques that go beyond basic carpet laying. These methods ensure edges remain secure and transitions appear seamless for years.
Professional Advice and Best Practices
Skilled fitters understand that proper edge treatment directly impacts longevity. They employ methods preventing lifting and fraying over time.
Correct substrate preparation forms the foundation of quality work. Surfaces must be clean, dry, and level before any materials are placed.
Specialist retailers now offer valuable consultation services. Customers can email photographs of their existing setups for personalised recommendations on suitable Carpet Trims.
Best practices include adequate stretching before fitting any components. Positioning grippers correctly relative to transition points is equally crucial.
Quality components throughout the process contribute substantially to long-term performance and customer satisfaction.
Experienced installers recognise the importance of expansion gaps. This is particularly vital when joining materials that react to humidity changes.
Different fastening methods suit various profile types. These include adhesive applications, screw fixings, and specialised gripper systems for edge retention.
Selecting profiles that accommodate specific pile heights ensures optimal results. This attention to detail separates amateur attempts from truly polished work.
Incorporating Carpet Trims in Design Aesthetics
Today’s interior schemes treat transition components as deliberate style choices. They move beyond pure functionality to become integral parts of the overall visual narrative. This shift reflects a growing appreciation for detail in contemporary spaces.
The strategic selection of finishes offers two distinct approaches. Designers can choose to blend transitions seamlessly into the existing scheme. Alternatively, they might create deliberate contrasts that define zones and add architectural interest.
High-specification projects frequently specify premium products. These coordinate with broader material palettes including hardware and fixtures. The result is a cohesive environment where every element feels intentionally chosen.
Understanding visual weight is crucial for successful integration. Components should enhance transitions without dominating them. Maintaining appropriate scale relative to surrounding features ensures harmonious results.
Colour and finish significantly influence perceived dimensions. Lighter options tend to expand visual space in smaller rooms. Darker selections provide grounding definition between different areas.
Early planning stages represent the ideal time for these decisions. Coordinating materials, trims, and complementary elements from the outset yields superior outcomes. This proactive approach prevents aesthetic compromises later.
Professionals recognise that well-chosen details elevate entire installations. They contribute to sophisticated, cohesive interiors that demonstrate exceptional attention to detail. The right selection truly completes the visual story.
Details on Transition Bars and Threshold Solutions
Variable height threshold bars represent advanced transition technology designed specifically for real-world level discrepancies. These components bridge gaps where surfaces meet at different elevations, providing safe and aesthetically pleasing connections.
Specialised profiles address challenges that standard flat joining systems cannot handle effectively. They transform potential trip hazards into smooth, durable transitions throughout properties.
Exploring Variable Height Threshold Bars
These innovative solutions accommodate height variations up to 21mm between adjacent surfaces. Their adjustable mechanisms provide versatile answers to common installation scenarios.
Different flooring thicknesses and subfloor conditions often create level differences. Variable height thresholds ensure seamless joins despite these real-world challenges.
Installation Examples from Wickes and Others
Wickes offers exclusive colour-matched options including Madera Light Hickory and Arreton Light Grey Oak profiles. These coordinate beautifully with popular wood laminate ranges.
The Oak Variable Height Threshold Bar exemplifies purpose-designed products for smooth room transitions. Available in 0.9m lengths, it delivers neat, professional appearances.
Product Name
Maximum Height Difference
Length
Key Feature
Madera Light Hickory Threshold
21mm
0.9m
Colour-matched to hickory flooring
Arreton Light Grey Oak Threshold
21mm
0.9m
Coordinates with grey oak finishes
Oak Variable Height Threshold
21mm
0.9m
Traditional oak appearance
Silver Flooring T-bar & Reducer
Various levels
1.8m
Covers gaps at different heights
These threshold solutions prove particularly valuable in doorways and room transitions. They accommodate different heights with easy-fitting designs that enhance property presentation.
Durability and Maintenance Considerations
The resilience of transition elements determines how well they protect vulnerable edges and maintain structural integrity. These components face concentrated stress from foot traffic and cleaning equipment daily.
Material selection directly impacts long-term performance. Metal options typically outlast plastic alternatives, resisting impact damage while keeping their appearance. This quality ensures secure positioning over years of service.
Maintenance needs vary significantly across different materials. Metal finishes require simple cleaning but resist staining effectively. Wood-effect products may need refinishing if coatings wear down in busy areas.
Material Type
Durability Rating
Maintenance Level
Expected Lifespan
Solid Brass
Excellent
Low
10+ years
Reinforced Aluminium
Good
Low
5-8 years
Wood Composite
Medium
Medium
3-5 years
Basic PVC
Basic
High
1-3 years
Regular care extends service life considerably. Vacuuming around edges and checking fixings prevents minor issues becoming major problems. Professionals recommend considering total lifecycle costs when choosing products.
Premium selections often deliver better value despite higher initial prices. They maintain performance without warping or finish degradation that affects cheaper alternatives. Proper trim selection protects carpet edges and enhances overall flooring durability.
Cost Implications and Investment Value
Investment decisions in finishing details involve balancing upfront costs against long-term performance benefits. The market offers a wide spectrum of options with corresponding price differences.
Budgeting for Premium Installations
Price variations reflect material quality and manufacturing standards. Basic edge protection starts around £4.99, while premium selections reach £16.95.
Custom colour and length options increase costs modestly. They deliver superior aesthetic results and reduce material waste.
Price Category
Cost Range
Typical Materials
Expected Lifespan
Budget Options
£4.99 – £8.99
Standard metals, basic finishes
1-3 years
Mid-Range Products
£9.00 – £14.99
Reinforced materials, colour options
3-5 years
Premium Range
£15.00 – £16.95+
Solid brass, custom finishes
5-10+ years
Professional contractors typically recommend mid-to-premium selections. Quality components protect reputations and minimise callback issues.
The price differential often amounts to modest sums. These pale against potential costs of premature failure and reinstallation.
Comprehensive project budgeting should allocate appropriate resources. Quality trim represents small percentages of total flooring costs yet significantly impacts results.
Meeting Environmental and Safety Standards
Contemporary building projects must navigate an increasingly complex landscape of environmental and safety regulations that govern material selection and installation practices. These requirements ensure both ecological responsibility and occupant protection throughout a property’s lifecycle.
Environmental considerations now significantly influence product specification. Manufacturers respond with sustainable material sourcing and reduced packaging. Recyclable designs minimise ecological impact while maintaining performance.
Safety standards mandate smooth transitions between different surface levels. Components must eliminate tripping hazards while providing secure connections. Building regulations specify appropriate height changes and secure fixing methods.
Commercial installations often demand specific performance characteristics. These include slip resistance ratings and fire performance classifications. Residential projects may have different compliance requirements.
Quality manufacturers provide comprehensive technical documentation. This details compliance with British and European standards. Such documentation facilitates specification for regulated projects.
Durable products that resist premature replacement offer superior sustainability. They reduce waste compared to disposable alternatives requiring frequent renewal.
Safety-focused practices ensure components are securely fastened and free from sharp edges. Proper positioning avoids catching feet or mobility aids. Ongoing maintenance preserves safety characteristics throughout service life.
Future Trends in Carpet Trim Technology
Innovation continues to reshape how interior transitions are created and maintained. The industry is moving toward smarter, more sustainable solutions that address both functional and aesthetic requirements.
Manufacturers focus on enhancing installation convenience through user-friendly designs. Click-fit systems and adhesive-free mounting options are becoming standard features.
Innovations and Upcoming Materials
Research explores sustainable alternatives to traditional components. Bio-based polymers and recycled content products offer reduced environmental impact.
New material types provide enhanced durability while maintaining visual appeal. These advancements respond to growing demand for eco-conscious building materials.
Innovation Type
Key Feature
Potential Benefit
Smart Integration
Embedded wear sensors
Predictive maintenance alerts
Universal Profiles
Multi-material compatibility
Reduced inventory complexity
Minimalist Designs
Reduced visual presence
Enhanced aesthetic subtlety
Sustainable Materials
Bio-based polymers
Lower carbon footprint
Adapting to Changing Design Needs
Contemporary flooring schemes demand versatile transition solutions. Open-plan layouts and mixed-material approaches require flexible trim options.
Manufacturers develop profiles that accommodate emerging floortypes like luxury vinyl tiles. Custom colour matching services address specific design preferences.
The future points toward universal compatibility systems. Single solutions will handle multiple carpet and hard flooring combinations effectively.
Conclusion
Mastering the final touches in room design separates exceptional results from merely adequate outcomes. This comprehensive exploration has detailed how transitional elements contribute to successful interior projects.
Quality selections and proper techniques protect floor coverings while ensuring safety and aesthetic appeal. The right trim choices significantly influence long-term performance and visual harmony.
This information empowers homeowners and professionals to make informed decisions about their flooring projects. Understanding material options and profile designs leads to confident specification and installation.
Despite representing modest cost portions, these details deliver disproportionate value. They transform spaces through durable, safe transitions that withstand years of service.
FAQ
What is the primary purpose of a carpet transition strip?
A transition strip’s main role is to create a safe, neat finish between two different floor coverings. It bridges gaps and covers raw edges, ensuring a smooth change in levels between surfaces like wood laminate and vinyl tile.
How do I choose the right trim for different floor heights?
Selecting the correct profile depends on the height difference between the adjoining floorings. For minimal differences, a low-profile cover strip works well. For larger variations, a ramp or variable height threshold bar from brands like Wickes provides a gradual, safe incline.
Are aluminium trims better than plastic ones?
Aluminium trims generally offer superior durability and a more robust finish compared to plastic accessories. They are ideal for high-traffic areas, providing long-lasting performance and a sleek, modern look that complements various interior styles.
Can carpet tiles be finished with the same trims as broadloom carpet?
Yes, most standard edge and transition products are suitable for both carpet tiles and broadloom installations. The key is to ensure the trim’s design adequately secures the tile edges and matches the overall aesthetic of the flooring.
What tools are essential for a professional trim installation?
A successful installation typically requires a fine-toothed saw for precise cutting, a strong adhesive suitable for the subfloor, a measuring tape, and a rubber mallet. These tools help achieve accurate fitment and a seamless final appearance.
How do threshold bars contribute to room safety?
Threshold bars eliminate tripping hazards by covering the gap between two floorings and creating a smooth transition. They also help prevent fraying at the edges of materials, contributing to a safer and longer-lasting floor covering.
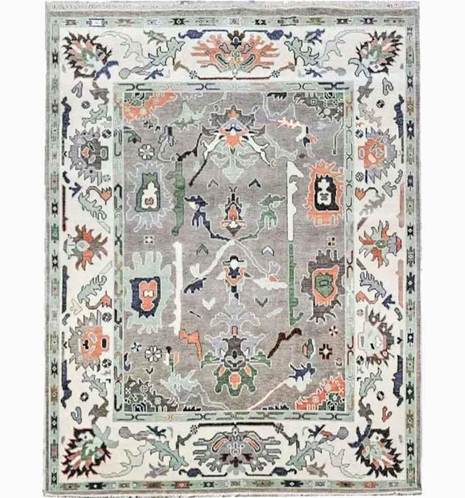
A rug may be a simple home accessory, but it brings luxury, character, and texture into a living space. When choosing one, you might get confused deciding whether you choose hand-knotted rugs or hand-tufted rugs. Both are made carefully by expert artisans and can instantly elevate any given space. But there’s a slight difference between the two in terms of their craftsmanship, cost, durability, and long-term experience.
Our 2026 rugs guide takes you through the differences between hand-knotted and hand-tufted rugs. By the end of the article, you’d be able to differentiate them and choose which one is right for your space.
Hand-Knotted Rugs: Exude Art in Every Knot
Handknotted rugs boast the most traditional and oldest form of rug-making technique. Each knot is hand-tied onto a vertical loom that takes months or even years to complete one rug. Since this rug style is the result of controlled tension and color placement, and proper knot density, showcasing an artisan’s craftsmanship. Due to its incredible exquisiteness, durability, and clarity of work, no two pieces are the same.
Hand-tufted rugs are carefully crafted using a tufting gun, which is a handheld mechanical tool. For making this rug, an artisan has to punch loops of wool through a canvas that’s stretched onto a frame. After completion of a design, a latex layer is applied on its back to firmly hold tuffs in place along with a fabric backing. This rug crafting technique is faster than the hand-knotted mechanism. So, one can easily create many contemporary designs at a lower cost. While these are not as long-lasting as knotted rugs, they bring great style elements into your home for less price.
Pros & Cons of Hand-Knotted Rugs
Pros
High-knit density means high detailing with richer textures and sharp motifs.
Exceptional durability that may last for generations.
Great investment value due to rarity.
High resale or heirloom value because it’s considered a collectible piece.
Naturally organic, as no latex or glue is required. So, ideal for sensitive home environments.
Cons
Longer production time, as it’s made completely by hand knot-by-knot.
Higher cost due to exceptional craftsmanship and time required for completion.
Heavier in weight, so large rugs can be harder to move.
Pros & Cons of Hand-Tufted Rugs
Pros
Faster craft time, so ideal for instant décor change or style change.
Budget-friendly due to faster preparation time.
Plush, soft texture that feels cozy underfoot and feels good in bedrooms.
Wide design variety, so perfect for playful, modern, or bold looks.
Cons
Shorter lifespan of up to 5 to 10 years.
Lower resale or heirloom value, as it’s not considered a collectible piece.
Latex backing that may degrade over time, due to shedding.
Best Uses for Hand-Knotted Rugs
Place these in areas where longevity matters and the rug tells a tale of your home, like:
Living rooms
High-foot traffic spaces
Formal dining rooms
Design-focused interiors, boasting craftsmanship
Family heirloom gifting
These rugs pair wonderfully with natural wood furniture, timeless home décor, and heritage-style interiors.
Best Uses for Hand-Tufted Rugs
These rugs are more suitable for low-to-moderate foot-traffic areas or in rooms where you often refresh décor.
Bedrooms
Rental spaces
Kids’ rooms
Home offices
Seasonal décor updates
Their ease of styling and softness make them perfect for comfort-led areas in your house or workspace.
Price Differences & Material Choices
When shopping for premium handmade pieces, go for hand-knotted rugs made with luxurious wool, bamboo silk, silk blends, and cotton backings. While hand-knotted rugs are expensive, buyers may even explore sale wool rugs for buying quality pieces at competitive prices.
On the other hand, when looking for designer aesthetics at lesser prices, go for hand-tufted rugs, including affordable Oushak rugs. These rugs with muted palettes add global charm to modern home interiors.
Key Factors to Consider When Making a Buying Decision
Longevity
For those who prefer longevity and need a rug that outlasts trends, hand-knotted rugs are the best choice.
Home Environment
For sensitive or humid home environments, go for hand-knotted (no latex) rugs.
Budget
Seeking an affordable rug upgrade? Choose tufted rugs to give an instant lift to your home interior.
Maintenance
Hand-knotted rugs age gracefully and can handle cleaning well. On the other hand, hand-tufted rugs may require frequent replacements.
Design Preference
Hand-knotted rugs excel in fine detailing and traditional design. Hand-tufted rugs, on the other hand, boast trendy, bold designs, making them suitable for modern interiors.
Q&A About Hand-Knotted vs Hand-Tufted Rugs
1. Which rug lasts longer: hand-knotted or hand-tufted?
Hand-knotted rugs can withstand for many years, up to generations. However, hand-tufted rugs can last only for around 5 to 10 years, depending on maintenance and usage.
2. Are hand-tufted rugs suitable for homes with pets?
Yes, these are good for homes with pets where you desire stylish rugs without stressing over long-term wear. However, hand-knotted rugs can resist pulling and flattening better. So, it can fare longer with more energetic pets.
3. Do both rug types shed?
While hand-knotted rugs shed minimally after initial weeks, hand-tufted rugs tend to shed more due to latex backing and cut piles.
Final Thoughts
Both rug types bring something unique to meet the varying preferences of distinct users. For those who love timeless artistry, hand-knotted rugs are the best choice. On the other hand, hand-tufted rugs offer modern convenience to those who often like to upgrade their home with changing trends.
Choose what aligns with your taste and living space while telling a tale of your home in a stylish manner. With brands, like Thread to Form, innovating toward more artisan-first and sustainable pieces, you can find the right home décor pieces that celebrate craftsmanship.
West Roxbury offers the perfect blend of suburban charm and city convenience—and when it comes to creating outdoor living spaces that last, homeowners are turning to Brazilian Wood Depot Ipe Decking. Whether you’re upgrading a backyard retreat or building a front porch that stands the test of time, Ipe delivers premium quality, beauty, and performance unmatched by other materials.
Engineered by Nature, Perfect for New England
Ipe wood, also known as Brazilian Walnut, is a top-tier hardwood with remarkable resistance to moisture, rot, insects, and even fire. That makes it perfect for Boston’s wide-ranging weather—from snowy winters to hot, humid summers. With minimal maintenance, Ipe decking lasts 40 to 75 years, far outlasting pressure-treated wood or composite materials.
No warping, no splintering, no hassle—just a rock-solid deck you can count on for decades.
Aesthetic Excellence for Any Home
Whether your West Roxbury home is a colonial, Victorian, or contemporary design, Ipe’s rich brown tones and tight grain bring natural elegance to your exterior. Homeowners can maintain the original color with a simple oil treatment or allow it to weather into a refined silver-gray tone that pairs beautifully with Boston’s classic aesthetic.
Experience You Can Trust
At Brazilian Wood Depot, every order comes with more than just wood—it comes with expert support. Their team takes the time to understand your project and offers personalized recommendations for board sizing, fastening systems, and installation best practices. Their approach ensures fewer mistakes and better results.
They don’t sell online for a reason: personalized planning ensures better performance and greater satisfaction. With Brazilian Wood Depot, you’re never alone during your decking project.
Fast, Reliable Shipping to West Roxbury
Brazilian Wood Depot ships your Ipe decking in custom-engineered crates designed to protect it during transit. Most orders ship within 1–3 business days. LTL shipments include GPS tracking options for added peace of mind, and hotshot delivery is available for faster, more flexible delivery windows.
Customers are responsible for unloading the shipment. Be prepared with a crowbar, knife, and hammer, and use your tracking info to coordinate the delivery efficiently.
Why West Roxbury Homeowners Choose Brazilian Wood Depot
Premium-grade Ipe hardwood with lasting durability
Personalized project guidance from seasoned professionals
Fast, protected shipping with optional GPS tracking
Dedicated customer service before, during, and after delivery
Make Your Deck a Statement Piece
If you’re ready to elevate your outdoor living experience, look no further than West Roxbury Brazilian Wood Depot Ipe Decking. With expert support and premium materials, Brazilian Wood Depot helps you build a deck that reflects the pride you take in your home—beautiful, strong, and built to last.
Contact Brazilian Wood Depot
Address: 6770 Buford Highway, Atlanta, GA 30340 Email:Info@BWDepot.com Phone: 770-830-4681 Hours: Monday–Friday, 7:00 AM – 3:00 PM EST
Compression sofas are designed to minimize shipping volume without sacrificing comfort or durability. This is achieved through precise engineering, material science, and strict quality control across every production stage. Each step, from foam formulation to final vacuum sealing determines the sofa’s comfort level, rebound speed, durability, and customer experience after unpacking.
Below are the six key stages involved in producing high-quality compression sofas and the standards that guarantee reliable recovery and lasting performance.
Foam Production and Expansion
Foam is the foundation of any compression sofa, representing more than 60% of total manufacturing costs. It defines comfort, resilience, and longevity. The foaming process must precisely manage chemical balance, density, and curing to maintain stability under long-term compression.
Optimal Foam Density: 28-32D high-resilience foam
Main Components and Reactions:
Polyether polyol + TDI – main reactants forming polyurethane foam
Foaming agents (e.g., cyclopentane) – control cell size and elasticity
Catalysts – ensure uniform reaction speed
Flame retardants (phosphate esters) – meet EU/US fire safety standards
Anti-aging additives – prevent hardening or cracking during storage
Process Flow:
Premixing: Polyol and additives form “Material A”; isocyanate becomes “Material B.”
High-speed blending: Mix A and B at 2000–3000 rpm (ratio ~1:1).
Casting: Pour into seat, backrest, and armrest molds.
Curing: Allow 24 – 48 hours in a ventilated area for full chemical reaction and structure stabilization.
Output: High-resilience foam blocks ready for precision cutting.
Foam Cutting and Shaping
Once cured, foam blocks are cut into ergonomic shapes that match the sofa’s design. Precision cutting ensures perfect fit and rebound symmetry after compression.
Process Highlights:
CNC cutting guided by CAD data (tolerance ±1 mm)
Positioning marks for zippers, buckles, and frame alignment
Relief grooves to prevent fabric wrinkles during compression
This step ensures every foam section aligns seamlessly with its cover and provides balanced rebound after unpacking.
Fabric Cutting and Sewing
The sofa’s fabric must withstand compression, resist wrinkling, and remain durable over time.
Fabric Options:
Cotton-linen blends or polyester-spandex for elasticity and wrinkle resistance
Optional Teflon coating for water and stain protection
Heavy-duty zippers with metal teeth and thick zipper tape (tensile ≥300 N)
Breathable mesh lining with 1–2 cm expansion allowance for rebound
These features ensure the upholstery maintains its shape and quality even after multiple compressions.
Upholstery and Final Assembly
In this stage, foam components are carefully inserted into their fabric covers to achieve precise fit and smooth lines.
Assembly Process:
Guided alignment with pre-marked reference points
Gradual stuffing to prevent fabric overstretch
Edge smoothing to eliminate trapped air
Internal fixation (elastic straps or buckles) to prevent displacement
Quality Inspections:
Seam tension testing
Surface flatness checks
Partial rebound simulation to test shape recovery
Vacuum Compression and Sealing
This is the defining stage that transforms a standard sofa into a “compression sofa.” The goal is to reduce packaging volume by up to 80% while preserving foam integrity.
Process Steps:
Pre-shaping: Sofa folded into an even, pressure-ready configuration.
Compression: Hydraulic or roller press evenly compresses the foam.
Vacuum sealing: High-barrier PE film ensures airtight protection.
Heat sealing: Locks in vacuum and guards against moisture.
Performance Benchmarks:
≥95% shape recovery within 24–48 hours after unpacking
No seam tearing or zipper failure
Internal foam structure remains intact and elastic
Packaging, Storage, and Shipment
After sealing, the compressed sofa is secured for transport and retail display.
Quality Controls:
Heavy-duty 5-layer export cartons with corner guards
Protective inner boards for impact resistance
Humidity-controlled warehouse storage
ISTA-standard drop and vibration testing
Traceability:
QR code for batch details (foam density, fabric type, compression date)
Clear orientation and moisture warning labels
About KINGSEN Foam – Expert in Compression Sofa Manufacturing
KINGSEN Foam is a leading Chinese manufacturer specializing in high-density foam products and compression sofas for over 20 years. Their product range includes modular sectionals, sofa beds, bean bags, kids’ couches, and play furniture.
Offering full OEM & ODM customization, KINGSEN tailors material, color, size, and branding to meet client needs. The company operates a 25,000 m² factory equipped with over 200 advanced machines and a strict ISO9001:2015, BSCI, and IAF-certified quality management system.


: Pros, Cons & Best Uses")